
I wanted to show you my latest creation. Christmas is around the corner and I know that many of you are scratching your heads trying to find the perfect gift for your loved ones that won't cost you a fortune, plus it would be useful and most importantly HANDMADE!
As I was browsing my computer inspiration files (yes I have many of those files) I saw a printable of a sticky notes cozy from Peptogirl. What a great idea that is! I wanted to make one ASAP! But the sticky notes that I had around didn't fit in this one, they were too thick, so I decided to make one on my own from scratch. So, here's the tutorial that I've come up with.

As I was browsing my computer inspiration files (yes I have many of those files) I saw a printable of a sticky notes cozy from Peptogirl. What a great idea that is! I wanted to make one ASAP! But the sticky notes that I had around didn't fit in this one, they were too thick, so I decided to make one on my own from scratch. So, here's the tutorial that I've come up with.

Supplies:


❤ sticky notes, any size you like
❤ piece of thick paper, card stock e.t.c. patterned or plain.
❤ piece of thick paper, card stock e.t.c. patterned or plain.
❤ a design program as Photoshop, Illustrator, Corel Draw (optional, if you want to set up the whole thing and print it)
❤ printer (optional, if you want to print something on it)
❤ a bone folder (optional)
❤ a bone folder (optional)
❤ ruler and cutter or scissors (cutting mat, optional but really useful)
❤ a set of Velcro fasteners
❤ double sided tape or glue (optional)
❤ a set of Velcro fasteners
❤ double sided tape or glue (optional)
❤ decorative scissors or edge puncher
❤ fancy stickers, ribbons, buttons e.t.c.
Instructions:
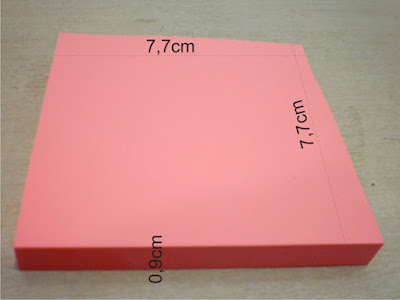
❤ First of all, you take your sticky notes pad and measure it around. Mine was 7,7 x 7,7 x 0,9 cm.
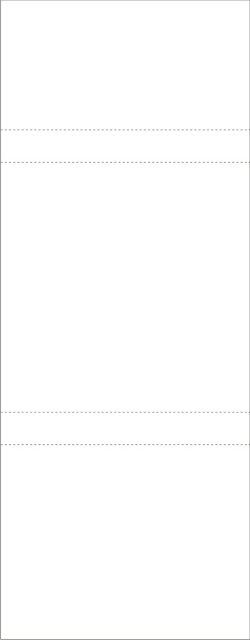
 ❤ On a piece of paper you can make a ruff sketch of how your final piece would be so that you'll know exactly the final size of it. Your measurements (7,7 x 7,7 cm) would be the center piece, the back of your sticky notes, and then add the 0,9 cm on top and on bottom, plus one more mm (so that you can fold it) that's 1 cm on each side. Next, add another rectangle on the bottom, let's say 7,7 x 6 cm (that would be the top cover) and another smaller rectangle on the top 7,7 x 4 cm.
 ❤ You can either skip that step. Open a design program and make the same sketch that you did on paper being careful to use the exact same measurements. Now you can add whatever you want, design a pattern, put clip arts, add a clever note... use your imagination. Just keep in mind that whatever you put on the upper side must be reversed (upside -down) so that when you fold it you can see everything straight. When you are done and satisfied with the result print it on the card stock paper that you desire.

 ❤ If you don't design it on your computer, just make the same measurements directly on you paper and with a ruler and a cutter or if you're really good with scissors cut it around. Then, with a bone folder, fold the dashed lines.

 ❤ Now you can cut the edges with an edge puncher or use a decorative scissors to make the edges a little bit more interesting.

 ❤ Take your sticky notes and you can either put them in right away (if they are sticky enough to stay in place) or for being more secure, add a piece of double sided tape or just a bit of glue.

 ❤ Pill off the back of the bottom piece (or the top, it doesn't matter) of the Velcro fasteners, stick it to the desired place and then take off the other one and just put the card stock cover on it. That way you can be sure that you have sticked everything right in place.


 ❤ Finally, you can use whatever material you want to decorate your cover. You can stamp it, add stickers, ribbons, gift tags, glitter or whatever you can think of. It depends on the occasion. This would make a perfect gift for little kids, co-workers, Valentine's day, Christmas or just for fun. And the good part is that you can re-use it if you want to. You'll just have to stick another sticky note pad inside!
You can customize it however you want. Here are some ideas:


For better folding use your ruler as a guide and
with the edge of your bone folder, mark the dashed lines.


You can customize it however you want. Here are some ideas:


You can download the printable version
(for personal use only, not for resale. Thanks!)

I hope that you enjoyed it and if you make
something like that I'd love to see it!
Thanks For Stopping By!
Thanks For Stopping By!

