Showing posts with label tutorial. Show all posts

Friday, March 25, 2011

Tutorial - Heart Shaped Scented Pillow

Happy Name Day to Evaggelos,
Vaggelis and  Evaggelia!
Oh, and my father of cource
who has his Birthday today!
Today I wanted to show you a little something that I've made some time ago. Α little Heart Shaped Scented Pillow filled with scented rocks and pot pouri.
A fun creation that you can give it also as a gift to the ones you love, putting a little love note inside the pocket. It can be used inside your closet or drawers or even as decoration.

Χρόνια Πολλά στον Ευάγγελο,
Βαγγέλη και Ευαγγελία!
Α, και στον πατέρα μου φυσικά
που έχει τα γενέθλιά του σήμερα!
Σήμερα ήθελα να σας δείξω κάτι που έφτιαξα λίγο καιρό πριν. Ένα μικρό Αρωματικό Μαξιλαράκι σε Σχήμα Καρδιάς γεμάτο με αρωματικές πέτρες και ποτ-πουρί.
Μια διασκεδαστική δημιουργία όπου μπορείτε να την κάνετε και δώρο στους αγαπημένους σας, βάζοντας ένα γλυκό σημείωμα στην τσέπη. Μπορεί να χρησιμοποιηθεί μέσα στην ντουλάπα ή τα συρτάρια σας για να τα αρωματίσει ή ακόμα και σαν διακοσμητικό.
I think the images describe easily the process.
If there's something that you'd need help with,
don't hesitate to ask me!

Πιστεύω πως οι εικόνες περιγράφουν εύκολα τη διαδικασία.
Αν υπάρχει κάτι που χρειάζεστε βοήθεια,
μην διστάσετε να με ρωτήσετε.
post signature

Friday, February 18, 2011

How To Make Tape Strips

Have you seen all around the web cute, interesting photos looking like this?
Έχετε δει τριγύρω στο διαδίκτυο χαριτωμένες, ενδιαφέρουσες φωτογραφίες
που δείχνουν κάπως έτσι;
Well, this effect of tape strips is so cute and so easy to be made. I have already used it on some of my pictures here.

Λοιπόν, αυτό το εφέ με τις λωρίδες από ταινία είναι τόσο χαριτωμένο και τόσο εύκολο να γίνει. Το έχω ήδη χρησιμοποιήσει σε μερικές από τις εικόνες μου εδώ.
You can do it too! First of all, you can go over to Pugly Pixel and download for free some really cool tape strips designs OR you can go to Powered By Pastries where the OH-SO-KIND-AND-TALENTED Katrina from Pugly Pixel shares a SUPER-DUPER easy tutorial so that you can make these tape strips in any color or pattern you like! I've made around 12 with different patterns so far! I think I'm hooked! Here are some:

Μπορείτε να το κάνετε κι εσείς! Πρώτα απ'όλα μπορείτε να πάτε στο Pugly Pixel και να κατεβάσετε δωρεάν μερικά πολύ όμορφα σχέδια Η μπορείτε να πάτε στο  Powered By Pastries όπου η ΤΟΣΟ-ΕΥΓΕΝΙΚΗ-ΚΑΙ-ΤΑΛΑΝΤΟΥΧΑ Katrina από το Pugly Pixel μοιράζεται ένα SUPER-DUPER εύκολο tutorial ούτως ώστε να μπορέσετε κι εσείς να φτιάξετε τέτοιες ταινίες σε ότι χρώμα και με ότι σχέδιο θέλετε! Μέχρι στιγμής έχω κάνει γύρω στα 12 διαφορετικά σχέδια! Νομίζω ότι εθίστηκα! Εδώ είναι μερικά:
I even made one with a rock pattern!
Έκανα ακόμη ένα με σχέδιο από πέτρες!
Isn't it great?!
Δεν είναι υπέροχο;
Come on! Try it yourselves!
Εμπρος! Δοκιμάστε το κι εσείς!

EDITED:
As, many of you may not be so familiar with Photoshop I have another suggestion for you. You can download  the tape strips from Pugly Pixel anyway and use them with any other photo editing program. You can choose PicasaPhotoscape or Pic Nic. The first two are free for downloading and the third one is a free online photo editing program but you'll have to pay a monthly fee if you want to use some more and different features. I usually use Photoscape and I find it really cool. It has many options and so many different effects that can make your photos PERFECT in no time, even if you don't have any idea about photo editing.
Maybe I'll make another special tutorial about how to use it and how to use the tape strips in it. Stay tuned!

ΕΠΕΞΕΡΓΑΣΙΑ:
Μια και πολλοί από εσάς μπορείνα μην είναι εξοικιωμένοι με το Photoshop σας έχω μια άλλη πρόταση. Μπορείτε να κατεβάσετε έτσι κι αλλιώς τις ταινίες από το Pugly Pixel και να τις χρησιμοποιήσετε με οποιαδήποτε άλλο πρόγραμμα επεξεργασίας φωτογραφιών. Μπορείτε να διαλέξετε το Picasa, το Photoscape ή το Pic Nic. Τα δύο πρώτα μπορείτε να τα κατεβάσετε δωρεάν και το τρίτο είναι ένα δωρεάν online πρόγραμμα επεξεργασίας φωτογραφιών αλλά θα πρέπει να πληρώσετε μια μηνιαία συνδρομή αν θέλετε να χρησιμοποιήσετε μερικά ακόμη ή διαφορετικά στοιχεία του. Εγώ συνήθως χρησιμοποιώ το Photoscape και το βρίσκω πραγματικά πολύ καλό. Έχει πολλές επιλογές και τόσα διαφορετικά εφέ που μπορούν να κάνουν τις φωτογραφίες σας ΤΕΛΕΙΕΣ πολύ γρήγορα, ακόμη κι αν δεν έχετε ιδέα για το πώς να επεξεργάζεστε φωτογραφίες.
Ίσως φτιάξω ένα ειδικό tutorial γι'αυτό και για το πώς μπορείτε να χρησιμοποιήσετε και τις ταινίες σε αυτό. Μείνετε συντονισμένοι!
post signature

Monday, January 24, 2011

Project Restyle - Week No4

Remember Project Restyle? Well, so far, I haven't been as committed to it as I would want to, but here is a new project. My brother had in his shop many pieces of unwanted small tiles in many colors and patterns, so he brought them to me saying "I'm sure you'll find something to do with them rather than throwing them away!" and I did, of course!
What you'll need?
- an empty bottle of milk
- a hot glue gun or any other strong glue
- small tiles or even beads, yarn, stones, sea shells
 First, wash your bottle well and remove the plastic tag.
 With a sharp knife cut off the bottle's "neck".
Gather your supplies, decide the pattern
that you want and start gluing!
Just as simple as that!
If you try it out I'd love to see it!
post signature

Tuesday, January 18, 2011

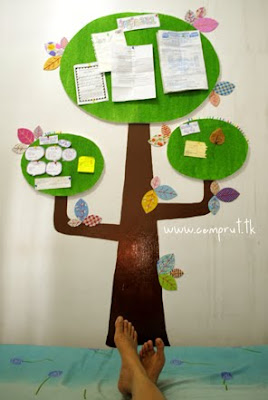
The Cutest Memory Board!

As soon as I saw this tutorial I knew that I had to share it with you! This is perfect for all of you who want their life organized, who make lists, who are in a state of planning all the time or who just keep forgetting things and need a constant reminder.
I introduce to you to The Plan Tree!
You can check the step-by-step tutorial at Aphrodita's blog.
It's SO CUTE!

post signature

Tuesday, December 28, 2010

Flower Headband

Just another thing that I've made. A couple of weeks ago I saw on A Beautiful Mess this Daisy Headband by Twinkie Chan.
So I've made my version.
A little more LOUD and colorful though.
Cute, huh?
post signature

Monday, December 27, 2010

Ho-Ho-Ho_Back Again!

Hello everyone! I hope you all had a very Merry Christmas! Mine included mainly eating -A LOT!- with family and friends but also I had the time to relax and create a thing of two. So, here is what I've made.
I had around a tutorial for a Boxy Cosmetic Bag but -as ALWAYS!- I can't follow the step by step instructions as they are, I have to experiment a little! hahaha The truth is that I haven't had a long zipper, so I thought that if I would change A LITTLE the measurements then it would fit the one I had around. I've made a mess! I've put the zipper on the wrong side, the measurements were in inches, I arbitrarily changed them into centimeters and... a whole new bag was born! hahaha
It looked like that
When it supposed to look like this

Then I figured... what if I would fold it in half
and maybe put a decorated elastic band to hold it?
And a whole different idea was born!
A cosmetic bag with two pockets.
Cool, huh?
The second one that I've made was based on a tutorial for a Make Up Bag. Again, I've made my changes. Since I didn't have the printed pattern, I've sketched one free handed on my own. I didn't use any fabric or any other for the inside lining, just the plastic fabric that I've used before.
My Bag ended up like this
When it supposed to look like this
make1
 A little close up
Well, aren't these two bags represent the phrase
"take this tutorial to the next level"? - hahaha
I'm thinking of making more of those. 
What do you think?
post signature

Friday, December 24, 2010

Last Minute Christmas Gift

A great idea for a last minute Christmas gift! All you need is your crochet hook, some yarn, a hair clip or a safety pin and some basic skills of crocheting. I've found a tutorial at Crochet Spot if you need any help but it's pretty simple, even without a tutorial. You just crochet a rectangle and then tie it in the middle. You sew, glue or tie it on the hair clip or safety pin and you're done! Simple as that!
You can also use it to decorate anything else, a purse, a blouse, even a package. You can make lots of them in every color, I know because I can't stop making them!
Merry Christmas everyone!
post signature

Friday, December 17, 2010

Crepe Paper Christmas Tree

When I saw this tutorial at Creative Chaos a couple of days ago I was amazed! It's the most beautiful Paper Christmas Tree that I've ever seen!
I knew I HAD TO MAKE IT, or even TRY to make it!
If only I had the same incredibly shinny silver glitter!
(plus more supplies and skills)
I'll show you step-by-step what I did but I recommend that you go directly to the original, the pictures are far more beautiful and professional. ( I shouldn't have said that.... but it's true! Mine are taken late at night with no natural light.)
This part is a little bit tricky because
this paper can be easily torn.
I think she has used a thicker kind of crepe paper.
Start from the bottom and hot glue as you go.
I've also made one with cotton balls
I've made these trays for decoration
They are made with plastic plates and cups
All finished up!
(I'm sorry for the crappy photos!)
Ok, not as good as the original, not
even so fluffy but it's decent enough!
The green one now decorates
my bo-boy's shop front window
the pink one is a gift to my good friend Afrodite
and these two are currently in my shop and
maybe will be sold at the Christmas Fair this weekend.
I've made the 3-D stars with card stock and glitter!
I've also tried to make these little
Christmas trees that I've seen around
with Bottle brushes.
What Do you Think?
post signature

Thank You So Much For Your Visit! Come Again Soon!