Showing posts with label how to. Show all posts

Wednesday, July 13, 2011

How To Build An Online Empire

I've came across this and I had to share. If you are willing to take the big step and let your creative self go out there and rock the world with your amazing and unique creations, you may have to consider these simple steps. I can't say that I'm THERE yet, but I'm working on it too. Go to Everything Etsy for more details.
Βρήκα αυτό και έπρεπε να το μοιραστώ. Αν είστε διατεθημένοι να κάνετε το μεγάλο βήμα και να αφήσετε τον δημιουργικό εαυτό να βγει και να συνταράξει τον κόσμο με τις καταπληκτικές και μοναδικές δημιουργίες σας, ίσως θα πρέπει να σκεφτείτε και αυτά τα απλά βήματα. Δεν μπορώ να πω ότι τα έχω καταφέρει ακόμα, αλλά κι εγώ το προσπαθώ. Πηγαίνετε στο Everything Etsy για περισσότερες πληροφορίες.
click image to enlarge
πατήστε την εικόνα για μεγέθυνση
Ηave you got other suggestions to add on this?
Please share them in the comments.
Έχετε άλλες προτάσεις να προσθέσετε;
Σας παρακαλώ, μοιραστείτε τες στα σχόλια.
post signature

Saturday, April 02, 2011

How to Make Create A Grab Button For your Blog

I know I've showed you how to make something like this before but now I've discovered a better and more easy way to do it, without needing to know anything about coding, nor will you have to type long codes and replacing text. SUPER EASY, I'm telling you! You can use the Grab My Button Code Generator!

Ξέρω ότι σας έχω ξαναδείξει πώς να φτιάξετε κάτι τέτοιο αλλά τώρα ανακάλυψα έναν καλύτερο και πολύ πιο εύκολο τρόπο για να το κάνετε, χωρίς να χρειάζεται να ξέρετε τίποτα από κωδικοποίηση, ούτε θα πρέπει να πληκτρολογήσετε τεράστιους κωδικούς και να αντικαταστήσετε κείμενο. ΠΑΝΕΥΚΟΛΟ, σας λέω! Μπορείτε να χρησιμοποιήσετε το Grab My Button Code Generator!

First of all, create the image you want on a photo editing program, let's say Photoshop, PhotoScape or Picnik sized approximately 160x170px (it depends on your blog's column width and the final size you want your button to be) and resolution 72 - 75dpi. Save it as a JPG format and load it on Photobucket or Flickr. From there you can copy the HTML code.


Πρώτα απ'όλα, δημιουργείστε την εικόνα σας σε ένα πρόγραμμα επεξεργασίας εικόνας, ας πούμε το Photoshop, το PhotoScape ή το Picnik, σε μέγεθος περίπου  160x170px (εξαρτάται από το μέγεθος στήλης του blog σας και από το τελικό μέγεθος που θέλετε να έχει το κουμπί σας) και ανάλυση 72-75dpi. Αποθηκεύστε το σε μορφή JPG και ανεβάστε το στο Photobucket ή στο Flickr. Από εκεί μπορείτε να αντιγράψετε τον κώδικα HTML για τη φωτογραφία.

Click the images to enlarge
Πατήστε πάνω στην φωτογραφία για μεγέθυνση
On this platform you enter your information.
The name of your blog, its URL and the
URL (HTML code) of the image
you want to use as your button.
You can also change the colors of the box
under the image which will contain the code
but I suggest you leave it as it is (white)
because it would look better.

Σε αυτή τη φόρμα εισάγετε τις πληροφορίες σας.
Το όνομα του μπλογκ σας, το URL του και
το URL (κώδικα HTML) της εικόνας
που θέλετε να χρησιμοποιήσετε σαν κουμπί.
Μπορείτε επίσης να αλλάξετε τα χρώματα
από το κουτί που θα βρίσκεται
κάτω από την εικόνα και που θα περιέχει τον κωδικό αλλά σας
προτείνω να το αφήσετε ως έχει (λευκό)
γιατί δειχνει καλύτερα.
Press preview to see that everything is ok
and you'll see your image and the code box underneath it.

Πατήστε προεπισκόπηση/preview για να δείτε
αν όλα είναι εντάξει
και θα δείτε την εικόνα σας και το κουτί
του κωδικού από κάτω του.
Press Get Code and your Blog Button Code
is ready to be placed on your blog.
Then in your Blogger Dashboard go to Design - Page Elements - Add A Gadget - HTML/ JavaScript and
copy-paste the following code into the text box.
You can also put a title like "Grab My Button" or whatever.
Save and position the button where you want it.
Preview your blog and if you are satisfied with the result,
save your changes.

Πατήστε Get Code και το Κουμπί του Μπλογκ σας είναι έτοιμο
για να το τοποθετήσετε στη σελίδα σας.
Ύστερα στο Blogger Dashboard πατήστε Design - Page Elements - Add A Gadget - HTML/ JavaScript και επικολλήστε τον κώδικα μέσα στο κουτί.
Μπορείτε επίσης να βάλετε και έναν τίτλο όπως "Αντιγράψτε το κουμπί μου" ή οτιδήποτε/
Αποθηκεύστε και τοποθετήστε το όπου σας αρέσει.
Κάντε προεσκόπηση στο μπλόγκ σας και αν είστε ευχαριστημένοι με το αποτέλεσμα,
αποθηκεύστε τις αλλαγές σας.

I hope that I've made myself understood.
If you need any help, don't hesitate to ask me. 

Ελπίζω να έγινα αρκετά κατανοητή.
Αν χρειάζεστε κάποια βοήθεια, μην διστάσετε να με ρωτήσετε.
post signature

Friday, March 18, 2011

How to Make Bunny Pancakes

Want to know
how to make these?
Muffin Tin Mom: How to Make Bunny Pancakes: "What's not to love about pancakes? I mean seriously. And pancakes made into adorable bunnies perfect for spring? Yes, please! Jenni Price of..."

I know that if I ever try something like this it would be a total disaster! But if any of you should try it I'd love to see! Plus, I'd love to be invited for breakfast or dinner, or tea party, or whatever! :-)
Also you can find other designs and recipes from this really talented lady here.
Ξέρω πως αν ποτέ δοκιμάσω να φτιάξω κάτι τέτοιο θα είναι καταστροφή! Αλλά αν κανένας από εσάς το δοκιμάσει θα ήθελα να το δω! Επιπλέον, θα ήθελα πολύ να με καλέσετε για πρωινό ή δείπνο, ή για τσάι, ή για οτιδήποτε! ;-)
Επίσης μπορείτε να βρείτε και άλλες συνταγές και
σχέδια από αυτήν την πολύ ταλαντούχα κυρία εδώ.

post signature

Friday, February 18, 2011

How To Make Tape Strips

Have you seen all around the web cute, interesting photos looking like this?
Έχετε δει τριγύρω στο διαδίκτυο χαριτωμένες, ενδιαφέρουσες φωτογραφίες
που δείχνουν κάπως έτσι;
Well, this effect of tape strips is so cute and so easy to be made. I have already used it on some of my pictures here.

Λοιπόν, αυτό το εφέ με τις λωρίδες από ταινία είναι τόσο χαριτωμένο και τόσο εύκολο να γίνει. Το έχω ήδη χρησιμοποιήσει σε μερικές από τις εικόνες μου εδώ.
You can do it too! First of all, you can go over to Pugly Pixel and download for free some really cool tape strips designs OR you can go to Powered By Pastries where the OH-SO-KIND-AND-TALENTED Katrina from Pugly Pixel shares a SUPER-DUPER easy tutorial so that you can make these tape strips in any color or pattern you like! I've made around 12 with different patterns so far! I think I'm hooked! Here are some:

Μπορείτε να το κάνετε κι εσείς! Πρώτα απ'όλα μπορείτε να πάτε στο Pugly Pixel και να κατεβάσετε δωρεάν μερικά πολύ όμορφα σχέδια Η μπορείτε να πάτε στο  Powered By Pastries όπου η ΤΟΣΟ-ΕΥΓΕΝΙΚΗ-ΚΑΙ-ΤΑΛΑΝΤΟΥΧΑ Katrina από το Pugly Pixel μοιράζεται ένα SUPER-DUPER εύκολο tutorial ούτως ώστε να μπορέσετε κι εσείς να φτιάξετε τέτοιες ταινίες σε ότι χρώμα και με ότι σχέδιο θέλετε! Μέχρι στιγμής έχω κάνει γύρω στα 12 διαφορετικά σχέδια! Νομίζω ότι εθίστηκα! Εδώ είναι μερικά:
I even made one with a rock pattern!
Έκανα ακόμη ένα με σχέδιο από πέτρες!
Isn't it great?!
Δεν είναι υπέροχο;
Come on! Try it yourselves!
Εμπρος! Δοκιμάστε το κι εσείς!

EDITED:
As, many of you may not be so familiar with Photoshop I have another suggestion for you. You can download  the tape strips from Pugly Pixel anyway and use them with any other photo editing program. You can choose Picasa, Photoscape or Pic Nic. The first two are free for downloading and the third one is a free online photo editing program but you'll have to pay a monthly fee if you want to use some more and different features. I usually use Photoscape and I find it really cool. It has many options and so many different effects that can make your photos PERFECT in no time, even if you don't have any idea about photo editing.
Maybe I'll make another special tutorial about how to use it and how to use the tape strips in it. Stay tuned!

ΕΠΕΞΕΡΓΑΣΙΑ:
Μια και πολλοί από εσάς μπορείνα μην είναι εξοικιωμένοι με το Photoshop σας έχω μια άλλη πρόταση. Μπορείτε να κατεβάσετε έτσι κι αλλιώς τις ταινίες από το Pugly Pixel και να τις χρησιμοποιήσετε με οποιαδήποτε άλλο πρόγραμμα επεξεργασίας φωτογραφιών. Μπορείτε να διαλέξετε το Picasa, το Photoscape ή το Pic Nic. Τα δύο πρώτα μπορείτε να τα κατεβάσετε δωρεάν και το τρίτο είναι ένα δωρεάν online πρόγραμμα επεξεργασίας φωτογραφιών αλλά θα πρέπει να πληρώσετε μια μηνιαία συνδρομή αν θέλετε να χρησιμοποιήσετε μερικά ακόμη ή διαφορετικά στοιχεία του. Εγώ συνήθως χρησιμοποιώ το Photoscape και το βρίσκω πραγματικά πολύ καλό. Έχει πολλές επιλογές και τόσα διαφορετικά εφέ που μπορούν να κάνουν τις φωτογραφίες σας ΤΕΛΕΙΕΣ πολύ γρήγορα, ακόμη κι αν δεν έχετε ιδέα για το πώς να επεξεργάζεστε φωτογραφίες.
Ίσως φτιάξω ένα ειδικό tutorial γι'αυτό και για το πώς μπορείτε να χρησιμοποιήσετε και τις ταινίες σε αυτό. Μείνετε συντονισμένοι!
post signature

Tuesday, January 18, 2011

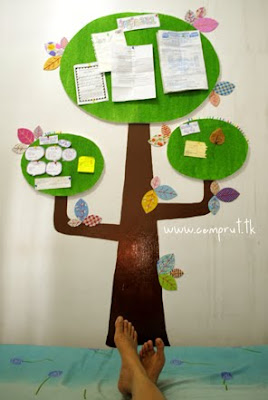
The Cutest Memory Board!

As soon as I saw this tutorial I knew that I had to share it with you! This is perfect for all of you who want their life organized, who make lists, who are in a state of planning all the time or who just keep forgetting things and need a constant reminder.
I introduce to you to The Plan Tree!
You can check the step-by-step tutorial at Aphrodita's blog.
It's SO CUTE!

post signature

Thank You So Much For Your Visit! Come Again Soon!