Showing posts with label sewing disasters. Show all posts

Tuesday, January 31, 2012

What I've been up to...

I'm going through a "sewing period"! Practice makes perfection, right? Well, I've decided to be perfect -or at least close to perfect- at sewing. And here's what I've been making the past few days:
Περνάω μια "περίοδο ραπτικής"! Η πρακτική φέρνει την τελειότητα, σωστά; Ε, λοιπόν αποφάσισα να γίνω τέλεια - ή τουλάχιστον να πλησιάσω στην τελειότητα- στο ράψιμο. Και εδώ είναι κάποια πραγματάκια που έφτιαξα τις τελευταίες μέρες:
 Cute Fabric Heart and Balloon Brooches
like the ones I've made before.
Χαριτωμένες Υφασμάτινες Καρφίτσες Καρδιά και Μπαλονάκι
σαν αυτές που είχα ξαναφτιάξει εδώ.
 Oven mittens
Γάντια κουζίνας
After two complete disasters (I kept making the thumb too narrow)
I have finally managed to make two sufficient oven mittens.
The thumb still has its problems, but overall they are cute.
Μετά από δύο ολοκληρωτικές καταστροφές (έκανα συνέχεια τον αντίχειρα πολύ στενό)
τελικά κατάφερα να φτιάξω δύο ικανοποιητικά γάντια κουζίνας.
Ο αντίχειρας έχει ακόμη κάποια προβλήματα, αλλά
σε γενικές γραμμές είναι χαριτωμένα.
 Fabric Bow Bracelets.
I've seen something like this made of leather and
I thought I should try to make it with fabric.
I think they are cute, although a couple are a little bit small
for my wrist but I have a large wrist anyway.
Βραχιόλια Υφασμάτινοι Φιόγκοι.
Είχα δει κάτι παρόμοιο φτιαγμένο από δέρμα και
σκέφτηκα να το δοκιμάσω και με ύφασμα.
Πιστεύω ότι είναι χαριτωμένα, αν και μερικά βγήκαν λίγο μικρά
για τον καρπό μου αλλά έτσι κι αλλιώς έχω αρκετά φαρδύ καρπό.
And finally, I've been able to manage the frustration with the bias tape.
and I think it's the best invention! So simple to make and piece of cake to use!
Oh, and I've finally learned how to use bias tape.
So much easier than I thought!
Και τέλος, κατάφερα να νικήσω την μάχη μου με το ρέλι.
Στο  Scientific Seamstress Blog βρήκα ένα  Printable Bias Tape Maker
και πιστεύω ότι είναι η καλύτερη εφεύρεση!
Τόσο απλό στην κατασκευή του και τόσο εύκολο στη χρήση!
Α, και επιτέλους κατάφερα να μάθω πώς ράβεται το ρέλι.
Πιο εύκολο από ότι νόμιζα!
post signature

Note:
DON'T FORGET to add your BLOG ADDRESS too when you leave a comment.
See my tutorial for more details.

ΜΗΝ ΞΕΧΝΑΤΕ να προσθέτετε και την ΔΙΕΥΘΥΝΣΗ ΤΟΥ BLOG ΣΑΣ όταν αφήνετε το σχόλιό σας.
Δείτε το tutorial για περισσότερες λεπτομέρειες.

Thursday, January 19, 2012

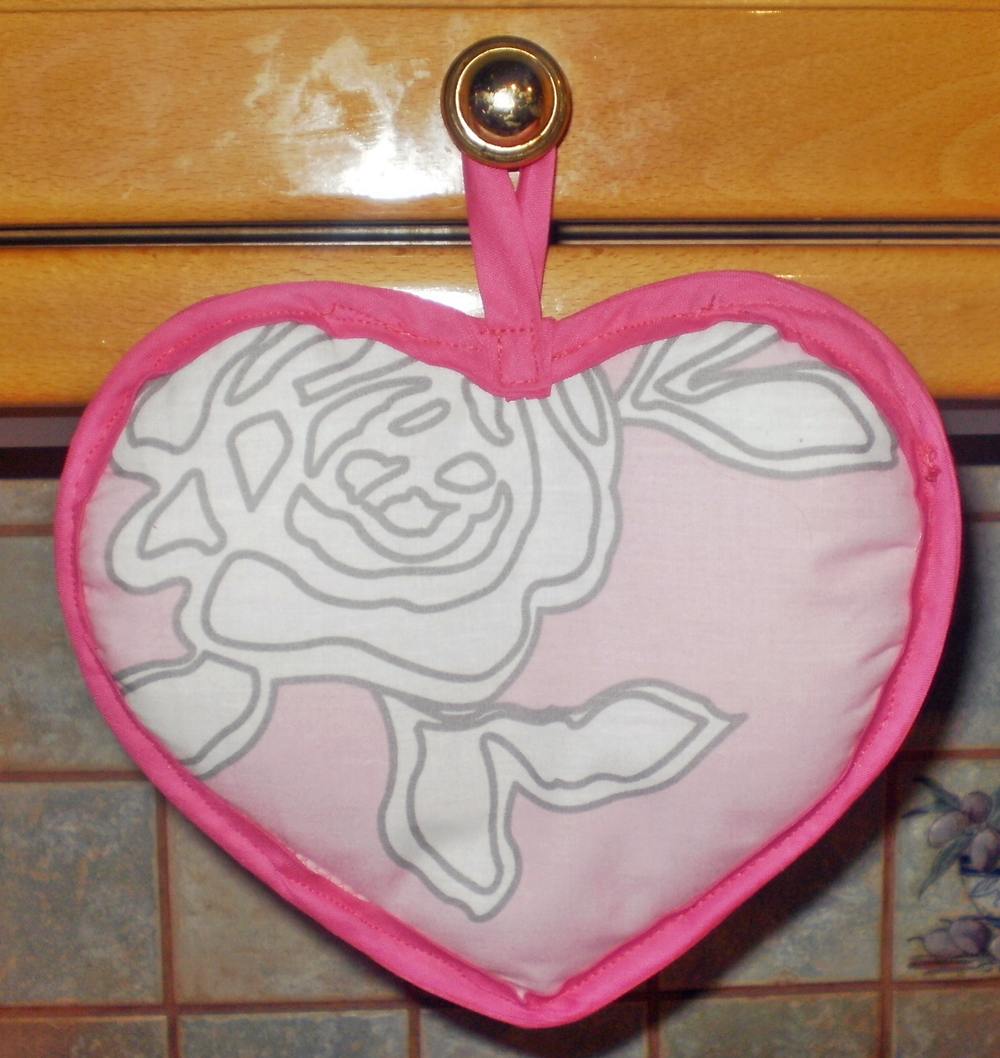
Heart Shaped Pot Holders

Maybe it's too soon to share ideas for Valentine's Day, but it won't hurt to plan ahead and prepare some cute things for that special day, or any other day. I've seen these Heart Shaped Pot Holders at Martha Steward and though that they are really cute. It's been a while since I've last sewn anything and that was a great opportunity to start again. The bad thing was that I didn't have the actual tutorial with me nor did I have a computer with an internet connection so I've improvised.
Ίσως είναι πολύ νωρίς για να μιλάμε για ιδέες για την μέρα του Αγίου Βαλεντίνου, αλλά δεν πειράζει να προετοιμαζόμαστε και να ετοιμάσουμε μερικά χαριτωμένα πραγματάκια γι'αυτή τη μέρα ή για όποιαδήποτε άλλη μέρα. Είδα αυτές τις πιάστρες για κατσαρόλες στην Martha Steward και σκέφτηκα ότι είναι πολύ χαριτωμένες. Έχει περάσει αρκετός καιρός από την τελευταία φορά που έραψα κάτι και αυτή ήταν μια καλή ευκαιρία να ξεκινήσω και πάλι. Το κακό είναι ότι δεν είχα μαζί μου το tutorial ούτε είχα υπολογιστή και σύνδεση στο internet γι'αυτό αυτοσχεδίασα.
So, this is what I did while trying to remember the full instructions.
Supplies:
Cotton batting
Pins
Cotton fabric (4 stacks of 12-by-12-inch pieces)
Bias tape
Sewing machine
Scissors
Cotton thread in contrasting or coordinating color
Download the Pot holder template from Martha Steward or design your own.
Να λοιπόν τι έκανα προσπαθώντας να θυμηθώ τις κανονικές οδηγίες.
Υλικά:
Βαμβακερή βάτα για γέμισμα (δεν έχω ιδέα αν αυτή είναι η κανονική ονομασία, αλλά έτσι μου το είπαν. Η αλήθεια είναι πως δυσκολεύτηκα λίγο να τη βρω. Στο μαγαζί που πουλάει κλωστές, φόδρες κ.τ.λ. δεν μπορούσαν να καταλάβουν τι θέλω και μου έδειχναν ένα καπιτονέ υλικό. Στο μαγαζί με τα υφάσματα μου είπαν ότι δεν έχουν τέτοιο πράγμα και τελικά μου πρότειναν να ρωτήσω σε ένα μαγαζί με μοκέτες, υλικά επένδυσης, αφρολέξ για μαξιλάρια κ.τ.λ. και να το ζητήσω ως βάτα. Είναι πάντως το υλικό που χρησιμοποιείται για επένδυση ή γέμισμα σε μπουφάν, μαξιλάρια κ.τ.λ., είναι σε ρολό του μέτρου, σε διάφορα πάχη και πωλείται με το κιλό. Ελπίζω να το βρείτε πιο εύκολα από ότι εγώ.)
Καρφίτσες
Βαμβακερό ύφασμα (4 κομμάτια περίπου 30x30εκ.)
Χρωματιστό ρέλι
Ραπτομηχανή
Ψαλίδι
Βαμβακερή κλωστή
Κατεβάστε το πατρόν Pot holder template από τη Martha Steward ή σχεδιάστε το δικό σας.
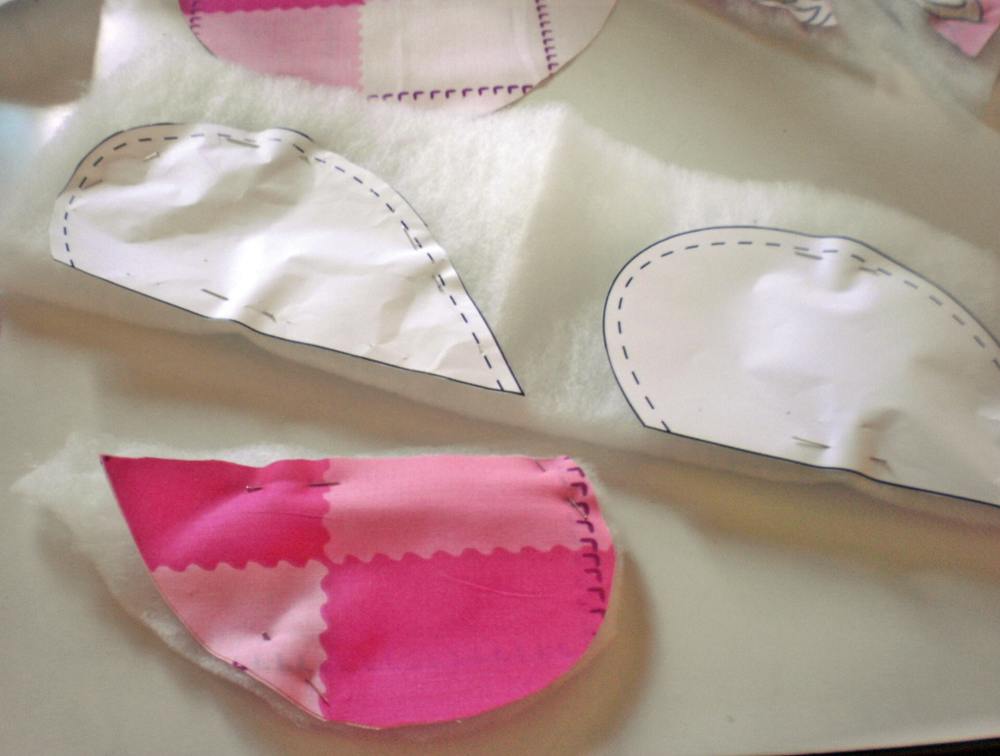
I've folded three layers of cotton batting in half.
Aligned batting template's straight side with fold, pinned and cut out.
 I've also cut two pieces (one for each pocket), although it wasn't in the actual tutorial.
I've laid the pocket template on two (instead of one) folded fabric heart and cut on diagonal line.
Δίπλωσα 3 κομμάτια από τη βάτα στη μέση. Καρφίτσωσα πάνω τους το πατρόν ευθυγραμμίζοντας την ευθεία πλευρά με το δίπλωμα και έκοψα.
Έκοψα επίσης δύο κομμάτια (ένα για κάθε τσέπη), αν και αυτό δεν υπάρχει στο κανονικό tutorial.
Καρφίτσωσα το πατρόν για τις τσεπούλες σε 2 (αντί για 1) διπλωμένα
κομμάτια υφάσματος και έκοψα διαγώνια.
Fold four stacked 12-by-12-inch pieces of cotton fabric in half.
Align heart template's straight side with fold, pin and cut out.
Δίπλωσα 4 κομμάτια ύφασμα περίπου 30x30 εκ. διπλωμένα στη μέση.
Ευθυγράμμισα το πατρόν πάλι στην ευθεία με το δίπλωμα, καρφίτσωσα και έκοψα.
I've sewn the bias tape to straight edge of pockets. That was a little bit tricky because the bias tape that I've found wasn't that wide and it was difficult to cover the edge evenly (fabric facing down, batting, fabric facing up) but I've managed it.
Έραψα το ρέλι στην άκρη κάθε τσέπης. Εδώ δυσκολεύτηκα λίγο γιατί το ρέλι που βρήκα ήταν πολύ στενό και δεν μπορούσε να καλύψει σωστά την τσεπούλα μου (ύφασμα από την ανάποδη, βάτα και ύφασμα από την καλή).
Τελικά κάπως τα κατάφερα.
 Layer the pieces, starting with a fabric heart (face down), batting, another fabric heart (face up), and pockets (face up). Pin everything in place.
Έβαλα όλα τα κομμάτια μου σε σειρά ξεκινώντας με την μια καρδιά από την ανάποδη πλευρά, τη βάτα, την επόμενη καρδιά από την καλή πλευρά και τις τσεπούλες.
Τα καρφίτσωσα όλα στην θέση τους.
Sew outside edge, leaving 1/4-inch seam allowance.
I've used a zig-zag stitch, don't ask me, I don't know why.
I thought I would be better.
Trim edge as close to stitching as possible.
Έραψα γύρω-γύρω αφήνοντας περίπου 0,5 εκ. περιθώριο.
Χρησιμοποίησα ραφή ζιγκ-ζαγκ, μην με ρωτήσετε γιατί, δεν ξέρω.
Πίστεψα ότι θα ήταν καλύτερα.
Μετά έκοψα γύρω-γύρω το ύφασμα που περίσσευε
όσο γινόταν πιο κοντά στη ραφή.

Sew bias tape to heart, starting at top center, folding ends under.
Ξεκίνησα να ράβω το ρέλι για τελείωμα, ξεκινώντας από πάνω
και στο τέλος το δίπλωσα στην άκρη του και το έραψα.


Sew 5-inch piece of bias tape, ends turned under, into a loop.

Stitch to pot holder.
Με ένα κομμάτι ρέλι περίπου 10 εκ. έφτιαξα μια θηλιά και
την έραψα στην κορυφή για να κρεμιέται.

I've tried to make another one because I wasn't satisfied with the result of the first one. 
The bias tape that I've used was too narrow and that wasn't so helpful.
The second pot holder turned out better but not as perfect as I 'd want to.
Προσπάθησα να φτιάξω ακόμη μία γιατί δεν έμεινα ικανοποιημένη από το αποτέλεσμα της πρώτης.
Το ρέλι που χρησιμοποίησα τελικά ήταν πολύ στενό και αυτό δεν με βοήθησε καθόλου.
Η δεύτερη βγήκε καλύτερη αλλά όχι τόσο τέλεια όσο θα ήθελα.
The truth is that I was a little disappointed. I may know a couple of things about sewing but when I try to actually SEW, always happens a little disaster.
I know that practice makes perfection but I can't help but wonder, could it be that I won't ever be good at sewing after all?
Η αλήθεια είναι πως απογοητεύτηκα λίγο. Μπορεί να ξέρω μερικά πράγματα από ράψιμο αλλά όταν τελικά προσπαθώ να ΡΑΨΩ, πάντα συμβαίνει μια μικρή καταστροφή.
Ξέρω πως η εξάσκηση κάνει την τελειότητα αλλά δεν μπορώ παρά να αναρωτιέμαι, μήπως τελικά δεν γίνω ποτέ καλή σε αυτό; Μήπως τελικά "δεν το'χω";
post signature

Note:
DON'T FORGET to add your BLOG ADDRESS too when you leave a comment.
See my tutorial for more details.

ΜΗΝ ΞΕΧΝΑΤΕ να προσθέτετε και την ΔΙΕΥΘΥΝΣΗ ΤΟΥ BLOG ΣΑΣ όταν αφήνετε το σχόλιό σας.
Δείτε το tutorial για περισσότερες λεπτομέρειες.

Friday, January 21, 2011

Anzouya Doll

A new idea has stuck into my head! I want to learn how to sew stuffed dolls! Last night was my first attempt. I sat in front of my sewing machine trying to figure out how on earth would I be able to make what I had in mind. I've seen many patterns online but -AS ALWAYS- I didn't have any of them handy at the time so, once again, I've improvised!
After a lot of sewing and unripping... here is the result:
Little Anzouya Doll!
20cm / 8 inches tall
A little messed up and abused.
As always, I try to make something with what I've got
so I could only stuff it with cotton balls and
it turned out a little bit stiff.
But not so bad after all!
What Do You Think?
post signature

Monday, December 27, 2010

Ho-Ho-Ho_Back Again!

Hello everyone! I hope you all had a very Merry Christmas! Mine included mainly eating -A LOT!- with family and friends but also I had the time to relax and create a thing of two. So, here is what I've made.
I had around a tutorial for a Boxy Cosmetic Bag but -as ALWAYS!- I can't follow the step by step instructions as they are, I have to experiment a little! hahaha The truth is that I haven't had a long zipper, so I thought that if I would change A LITTLE the measurements then it would fit the one I had around. I've made a mess! I've put the zipper on the wrong side, the measurements were in inches, I arbitrarily changed them into centimeters and... a whole new bag was born! hahaha
It looked like that
When it supposed to look like this

Then I figured... what if I would fold it in half
and maybe put a decorated elastic band to hold it?
And a whole different idea was born!
A cosmetic bag with two pockets.
Cool, huh?
The second one that I've made was based on a tutorial for a Make Up Bag. Again, I've made my changes. Since I didn't have the printed pattern, I've sketched one free handed on my own. I didn't use any fabric or any other for the inside lining, just the plastic fabric that I've used before.
My Bag ended up like this
When it supposed to look like this
make1
 A little close up
Well, aren't these two bags represent the phrase
"take this tutorial to the next level"? - hahaha
I'm thinking of making more of those. 
What do you think?
post signature

Monday, September 27, 2010

Doing My Home Ec Homework

Well, I'm getting pretty excited about all these projects. It's a great accomplishment for me and gives me satisfaction when I manage to complete each one of them. I can't help but making some mistakes though... but without mistakes you don't learn I suppose. Take a look at my latest sewing projects for Home Ec Online Class.
Cloth Napkin
I've only made one just to see how it'd come out.
 And I decorated it with this simple flower.
Supplies Roll-up
As I've told you before, I'm trying to use whatever material lays around. Until now I haven't bought anything. So, for the adjustable strap I've used one from an old bag and not the metal rings that were suggested, an oilcloth and a baby towel. I should have made the strap a little bit longer though.
 the inside of the roll-up
Reversible Bib
A little experiment. I didn't have any bias tape around so I thought I could make one myself. It turned out pretty good actually. Although I didn't have a bib to use as a template, so I've traced one freehanded. That's why I've ended up with some gaps. :-(
However, I'm really proud of myself that I pulled it off!
Sewing Machine Cover
I was absolutely sure that I've measured correctly... however, I've ended up with this. Oh, well, it's a little bit short... Big Deal!
Tell me what you think
and Have A Lovely Day!
post signature

Thank You So Much For Your Visit! Come Again Soon!