Showing posts with label project restyle. Show all posts

Friday, November 08, 2013

Ballerinas Shoes Makeover

A quick and easy DIY to restyle a plain and boring pair of ballerinas shoes.
Ένα γρήγορο και εύκολο DIY για να ανανεώσετε ένα απλό και βαρετό ζευγάρι μπαλαρίνες.
Kate had this pair of furry animal print ballerinas shoes but one of their velvet bows was missing (her dog ate it). She really loved those shoes, so she asked me if I could do something about it. Piece of cake!!! Two new velvet bows for you!
First, I cut a piece of velvet ribbon and attached it with hot glue on the "naked" shoe as a base like the other one had. Then I cut another piece of ribbon approximately the same size like the first one, folded the ends to the middle, slightly overlapping one another and backstitched leaving a little pieace of thread at the beggining and the end. Then I pulled the two ends of the thread and tied them tightly. I folded in half another piece of ribbon, twice as long as the first one and put my bow on the middle. With the remaining ends I made a knot. And that was it. I hot glued it in place and Kate's old ballerinas are ready to hit the roads again.
Η φίλη μας η Κατερίνα είχε αυτές τις χνουδωτές μπαλαρίνες αλλά ο ένας από τους βελούδινους φιόγκους τους έλειπε (τον έφαγε ο σκύλος της). Τις άρεσαν πολύ αυτά τα παπούτσια, γι'αυτό με ρώτησε αν θα μπορούσα να κάνω κάτι γι'αυτό. Πανεύκολο!!! Δύο ολοκαίνουριοι βελούδινοι φιόγκοι για  'σένα!
Πρώτα, έκοψα ένα κομμάτι βελούδινη κορδέλα και την κόλλησα με θερμόκολλα στο "γυμνό" παπούτσι σαν βάση όπως είχε και το άλλο. Στη συνέχεια, έκοψα ένα άλλο κομμάτι κορδέλας περίπου το ίδιο μέγεθος όπως το πρώτο, δίπλωσα τα άκρα προς τα μέσα, επικαλύπτοντας ελαφρά το ένα το άλλο και το έραψα αφήνοντας ένα μικρό κομμάτι του νήματος στο ξεκίνημα και στο τέλος. Μετά τράβηξα τα δύο άκρα του νήματος ώστε να "σουρώσει" λίγο ο φιόγκος και τα έδεσα σφιχτά. Δίπλωσα στη μέση ένα άλλο κομμάτι της κορδέλας, διπλάσιο από το πρώτο και τοποθέτησα τον φιόγκο μου στη μέση. Με τις δύο άκρες του έκανα ένα κόμπο. Και αυτό ήταν. Τους κόλλησα και αυτούς στη θέση τους και οι παλιές μπαλαρίνες της Κατερίνας είναι έτοιμες να οργώσουν ξανά τους δρόμους.
What do you think?
Πώς σας φαίνονται;
post signature
Follow on Bloglovin

Friday, October 05, 2012

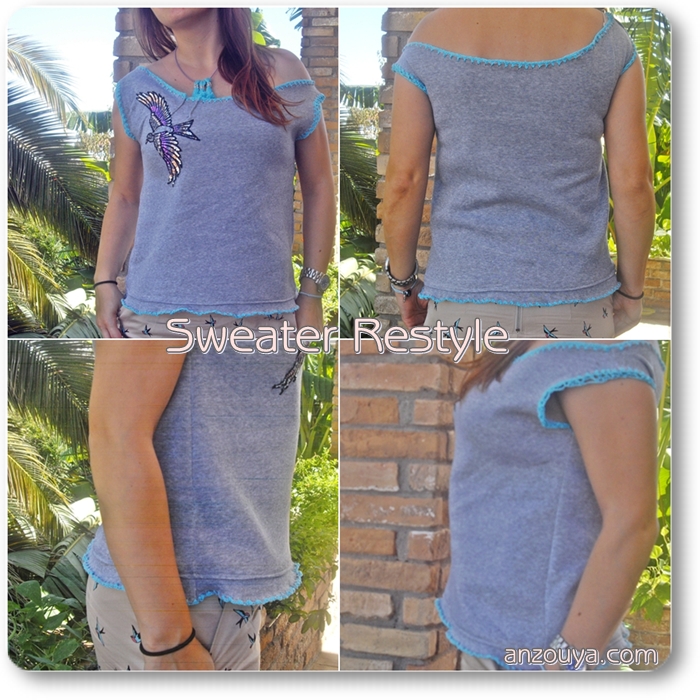
Sweater Restyle

(SPECIAL NOTE: To everyone who has left me a comment the last couple of months and hasn't heard from me... I'm so SORRY!!! It seems that it was my fault and I wasn't receiving any notifications about your comments. I was starting to wondering what was going on. Does my blog has become SOOOOOOO BORING?! Well, nothing so dramatic, it was just ME! So, I want to thank everyone who took the time to pay me a visit and even been so kind to leave me a comment. I'll be more careful from now on...)
Now back to our subject...

(ΣΗΜΕΙΩΣΗ: Προς όποιον/α μου άφησε κάποιο σχόλιο τους 2 τελευταίους μήνες και δεν πήρε καμμία απάντηση... Χίλια ΣΥΓΝΩΜΗ!!! Φαίνεται πως ήταν δικό μου λάθος και δεν λάμβανα τις ειδοποιήσεις για τα σχόλιά σας. Είχα αρχίσει να αναρωτιέμαι τι γίνεται. Μήπως το blog μου έχει γίνει ΠΟΛΥΥΥΥΥ ΒΑΡΕΤΟ;! Βασικά δεν συνέβει κάτι τόσο δραματικό, ΕΓΩ έφταιγα! Γι'αυτό θέλω να ευχαριστήσω όλους όσους έκαναν τον κόπο να με επισκεφθούν και που ήταν τόσο ευγενικοί ώστε να μου αφήσουν και κάποιο σχόλιο. Θα είμαι πιο προσεκτική από εδώ και πέρα...)
Πίσω στο θέμα μας τώρα...

First of all, I HAVE NO IDEA of what I'm doing! Yeah, you heard me, when it comes to clothing making, restyling e.t.c. I just "go with the flow", that's why most of the times everything is assymetric or wrong cutted. With that being said, I'm here to show you one of my latest attempts to create something wearable (there were also others, but I'll some them to you in time under a special title "Nightmare on Sewing Garments Street"!)
All started with a plain grey XXL men's sweater. I found one at a local store for only 8,00 euros so I wouldn't mind destroying it. I started cutting and cutting and cutting... I thought of a some kind of "assymetrical style" so that any mistakes won't show. Then by using a pair of pointy nail scissors I've pinched small holes, each one close to each other all the way around the neck line, the bottom line and arm holes of the sweater (yes, that wasn't captured in photos, sorry). And now for the tricky part. Crochet all around it! Yes, that was A LOT of work, all because I wanted to finish it all at once and I've started at around 11.00 p.m. so... you do the math. I've been crocheting even in my sleep. hahaha
Πρώτα απ 'όλα, ΔΕΝ ΕΧΩ ΙΔΕΑ τι κάνω! Ναι, καλά ακούσατε, όταν πρόκειται για ρούχα  «πάω με τη ροή", γι 'αυτό και τις περισσότερες φορές είναι όλα ασύμμετρα ή λάθος κομμένα. Αφού το ξεκαθαρίσαμε, είμαι εδώ για να σας δείξω μια από τις τελευταίες προσπάθειες μου για να δημιουργήσουν κάτι που να φοριέται (υπήρχαν και άλλες, αλλά θα σας τις δείξω στην ώρα τους κάτω από ένα ειδικό τίτλο «Εφιάλτης στον δρόμο της ραπτικής»!)
Όλα ξεκίνησαν με ένα απλό γκρι ανδρικό φούτερ σε XXL. Βρήκα ένα σε ένα τοπικό κατάστημα για μόνο 8,00 ευρώ γι 'αυτό δεν θα με πείραζε να το καταστρέψω. Άρχισα να κόβω και να κόβω και να κόβω... Σκέφτηκα να του δώσω ένα κάπως «ασύμμετρο στυλ" έτσι ώστε να μην φαίνονται και τα λάθη. Στη συνέχεια, χρησιμοποιώντας ένα μυτερό ψαλιδάκι νυχιών άνοιξα μικρές τρύπες, κάθε μια κοντά στην άλλη σε όλο το μήκος γύρω από τη λαιμόκοψη, το κάτω μέρος και τα μανίκια (ναι, αυτό το βήμα δεν το τράβηξα φωτογραφία, συγνώμη). Και τώρα το δύσκολο μέρος. Πλέξιμο με βελονάκι γύρω-γύρω! Ναι, αυτό ήταν πολλή δουλειά,, κυρίως γιατί ήθελα να το τελειώσω όλο με τη μία και εγώ άρχισα γύρω στις 23:00 μ.μ., έτσι ... μπορείτε να καταλάβετε. Έπλεκα με βελονάκι ακόμη και στον ύπνο μου. χαχαχα

Then, I had another idea. Decorate it with some "bling'bling", you know, to spice it up a little! So I've found a big bird applique made of sequins.
Μετά, είχα ακόμη μια ιδέα. Να το διακοσμήσω με λίγο "bling-bling", έτσι για να γίνει λίγο πιο ιδιαίτερο! Έτσι βρήκα ένα μεγάλο πουλί φτιαγμένο από πούλιες.
Ok, it has it flaws but I think that I could wear it on a night out or something, don't you think?
Οκ, έχει μερικά ελλατώματα αλλά πιστεύω ότι θα μπορούσα
να την φορέσω και κάπου έξω, δε νομίζετε;
Doesn't it look good with my swallow filled skirt from H&M
Δεν δείχνει καλά με την φούστα μου γεμάτη χελιδόνια από το H&M
post signature

Monday, January 31, 2011

Project Restyle - Week No 5

This week's Project Restyle is about my favorite Purple Beanie. It had started to worn out and the edges were fraying so I've decided to give it a makeover.
I have crocheted around the edge with a light purple yarn, just to keep it from fraying more and I have also added two of the flowers that I've made following the instructions of my new book.
Doesn't it look cuter now?
(I'm a mess in this photo, sorry!)
post signature

Thursday, January 13, 2011

Project Restyle - Old Creations

PrS_4
Project Restyle has already begun and it's on its second week. Unfortunately, I haven't made anything new yet. All I have to show you are some of my old creations that are made with unwanted, damaged and used items. Some of them are also under my blog's category Tutorials - Creations.
Earrings made of metallic bottle caps
A new use for an old oilcloth
A decorative bowl, good as new
with beads and paper napkin
Some old and torn tights, buttons and
wire and you have a beautiful brooch
Long gloves turned into cozy arm warmers
Restyle your boring Ugg boots 
 
Old CDs make beautiful candle holders
 
How to decorate a simple tote bag
Some Christmas tree balls and balls of yarn
and a Christmas decoration is all set
Domino pieces make cute little fridge magnets
Do you have a puzzle with missing pieces?
Make yourself some earrings!
Also go check the Project Restyle Group on Flickr where you can find a great source of inspiring new projects that you can make with old, damaged, unwanted, unusable vintage or even used materials.
post signature

Wednesday, December 29, 2010

Project Restyle

A fun project that I'm willing to follow this year:
PrS_4
Project Restyle is a just-for-fun creative group focused on ReStyling damaged, unwanted or unusable goods into fresh, beautiful pieces. Project ReStyle is Rachel's and Elsie's New Years Resolution! They are going to create weekly projects to give life to used items. They'll make fashion pieces as well as home decor projects!
Anyone can join in the fun....
Restyle_ad
Project ReStyle Guidelines
1. You must use unwanted, damaged or unusable vintage or used items to ReStyle. One of the big purposes of the group is that it encourages green living and is budget friendly. You can use items from your own closet/attic that you no longer love, thrifted finds or hand-me-downs. 
2. Take a Before & After photo of your ReStyled project. It's that simple!
3. Share your creative work on your blogs and in their Flickr Group. If you don't have a Flickr account, it's free to join. They'll be choosing favorites each week to share on their blogs, so you'll want to be sure to join the fun. 
4. You can create fashion, home decor or gift items. There are no limits on what types of items you can ReStyle! Be creative and make items you know you can really use!
So, don't wait any longer! Go and sign up your name in the comments to "pledge" to be a part of this challenge, join their Flickr group to share your creations and post on your blog each time you make a new project. This seems like so much fun! And I can't wait to see what everyone will come up with! I'm sure it will be a creative and inspiring experience!
post signature

Thank You So Much For Your Visit! Come Again Soon!